Adding a Home page

Overview

In this section, we will create a Home page that displays a form to allow users to create a game, invite others or join games. We will also set up navigation between the Home page and the Game page using React Router.

In src/pages create a new folder Home and add two files, index.jsx and home-styles.css

pages
├───Home
└───Game
Home
├───index.jsx
└───home-styles.css

Home page

In pages/Home/index.jsx add the following code for the Home page

/src/pages/Home/index.jsx
import React, { useState, useEffect } from 'react';
import Layout from '../../components/layout';
import './home-styles.css';
import ShareButtons from '../../components/share-buttons';
import Button from '../../components/button';
const Form = () => {
const [name, setName] = useState('');
const [gameID, setGameID] = useState('');
useEffect(() => {
const id = Math.random().toString().replace('0.', '');
setGameID(id);
}, []);
const handleSubmit = (event) => {
event.preventDefault();
};
return (
<div>
<h2>Play Chess with your friends online</h2>
<form onSubmit={handleSubmit}>
<input
type="text"
className="input"
value={name}
onChange={({ target }) => setName(target.value)}
placeholder="Display Name"
/>
<div className="gameId">Game ID: {gameID}</div>
<hr />
<p className="invite">Invite your friend over</p>
<ShareButtons
shareText={`https://stack-chess.netlify.app?id=${gameID}`}
subject="Join me for a game of Chess on Stack Chess"
/>
<Button>Create</Button>
</form>
</div>
);
};
const Home = () => {
const Image = () => (
<img src={require('../../assets/home.jpg')} alt="home" className="bg-img" />
);
return <Layout Content={Form} Image={Image} />;
};
export default Home;

We create a Form component with name and gameID as state values. We create and set a random gameID when this component is mounted on useEffect. The <input/> is controlled i.e it's value comes from the name state and we update the name state on every change. This helps us get the value of the input from our state and is a good way to manage form input elements. Read more on controlled components

<input value={name} onChange={({ target }) => setName(target.value)} />

In the Home component, we return the Layout component created earlier, passing the Form as the value of the Content prop and the Image component as the Image prop.

Let's include some styles for the Home page in pages/Home/home-styles.css

/src/pages/Home/home-styles.css
form {
width: 80%;
height: 100%;
}
.input {
width: 80%;
padding: 1.2rem 2rem;
outline: none;
border: 1px solid slateblue;
border-radius: 48px;
margin: 24px 0;
font-size: 18px;
}
.gameId {
background-color: #eaeaea;
color: slateblue;
border-radius: 48px;
padding: 1.2rem 2rem;
margin: 24px 0;
font-size: 18px;
text-transform: uppercase;
}
.home-img {
width: 50%;
height: 100%;
left: 0;
}
hr {
margin: 24px 0;
font-size: 18px;
}
.share {
margin: 16px auto;
width: 50%;
}

Reusable components

We also make use of ShareButtons component which shows some social media icons we can click on to share the link for this game.

Let's create this component in src/components/share-buttons create two files index.jsx and share-buttons-styles.css

components
├───board
├───cell
├───gameover
├───layout
├───piece
└───share-buttons
share-buttons
├───index.jsx
└───share-buttons-styles.css

Let's add the code for this component in share-buttons/index.jsx.

/src/components/share-buttons/index.jsx
import React from 'react';
import './share-buttons-styles.css';
const ShareButtons = ({ shareText, subject }) => {
const links = [
{
name: 'facebook',
url: `https://www.facebook.com/sharer/sharer.php?u=${shareText}`,
},
{
name: 'twitter',
url: `https://twitter.com/messages/compose?recipient_id=&text=${shareText}`,
},
{
name: 'gmail',
url: `mailto:?Subject=${encodeURIComponent(subject)}&body=${encodeURI(
shareText
)}`,
},
{
name: 'whatsapp',
url: `https://api.whatsapp.com/send?text=${shareText}`,
},
];
return (
<div className="share">
{links.map((link) => (
<a
href={link.url}
rel="noopener noreferrer"
target="_blank"
key={link.name}
>
<img
src={require(`../../assets/social/${link.name}.png`)}
alt={link.name}
/>
</a>
))}
</div>
);
};
export default ShareButtons;

We have a list of links, each link has a name ( of the site ) and the url to share through their API. We use .map to convert them into a list of elements <a/>. We pass the shareText and subject which are received as props to this links. The shareText is just a message with an invite link to this game

We also require an image for each link from our assets folder ../../assets/social/${link.name}.png

Let's add the styles in share-buttons/share-buttons.styles.css

/src/components/share-buttons/share-buttons-styles.css
.share {
display: flex;
align-items: center;
justify-content: space-around;
}

We also used a Button component. This is a resusable button extracted from our GameOver component. Let's create this button component in src/components/button/index.jsx

├───board
├───button -> create this
├───cell
├───gameover
├───layout
├───piece
└───share-buttons
button
├───index.jsx
└───button-styles.css
/src/components/button/index.jsx
import React from 'react';
import './button-styles.css';
const Button = ({ onClick, children }) => {
return (
<button onClick={onClick} className="button">
{children}
</button>
);
};
export default Button;

It receives the onClick event handler as a prop and a children prop for the text to show.

/src/components/button/button-styles.css
.button {
padding: 1.3rem 2.75rem;
text-transform: uppercase;
color: #fff;
background-image: linear-gradient(135deg, #8a1fa1 0%, #320995 100%);
border: none;
box-shadow: 0 0 20px 10px #d8d6d6;
border-radius: 3.5rem;
outline: none;
font-weight: bold;
font-size: 20px;
cursor: pointer;
font-family: 'Turret Road', cursive;
width: 90%;
margin-top: 1.5rem;
}

We will also reuse this button in the GameOver component.

Routing

Next, let's add routing/navigation to transition from the Home page to the Game page. For this, let's install React Router, a package which helps us handle client side navigation in React apps. In your project root folder run:

npm i react-router-dom

In src/App.js create the routes for our App.

/src/App.js
import React from 'react';
import { BrowserRouter as Router, Route } from 'react-router-dom';
import Game from './pages/Game';
import Home from './pages/Home';
import { GameProvider } from './context/GameContext';
import './App.css';
function App() {
return (
<Router>
<GameProvider>
<Route path="/" exact component={Home} />
<Route path="/game" component={Game} />
</GameProvider>
</Router>
);
}
export default App;

We import the BrowserRoutercomponent and rename it to Router. This should wrap all our routes. Next, we import a Route component which we use to specify the component to show for each path in our app. For the home path / we provide our Home component and this will get displayed. We use the exact prop to ensure that the path name is an exact match in order to render the Home component.

<Route path="/" exact component={Home} />

For the route /game we render the Game component.

<Route path="/game" component={Game} />

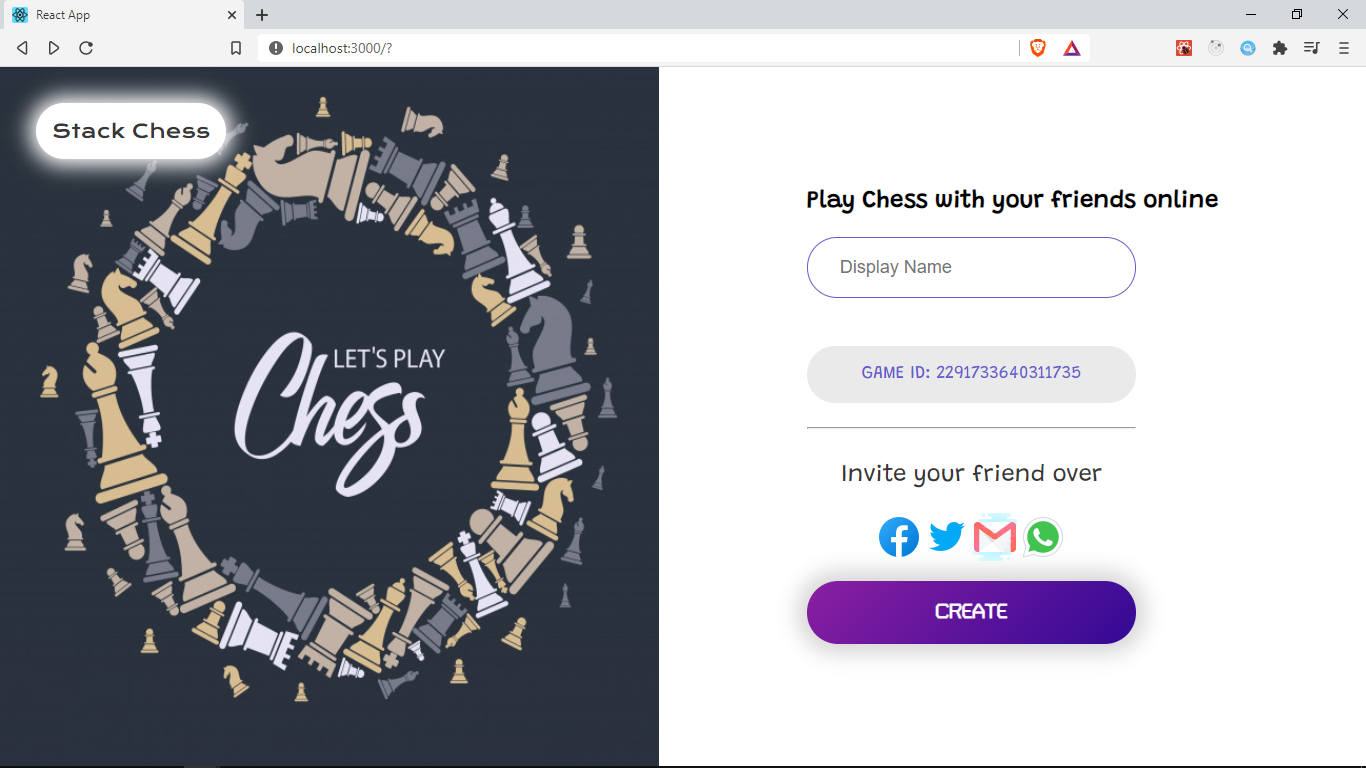
With that set up, here is what our app's home page looks like

img

If you append /game to the address bar root url, you should see the Game component rendered.

The code for this section can be found in this GitHub branch